
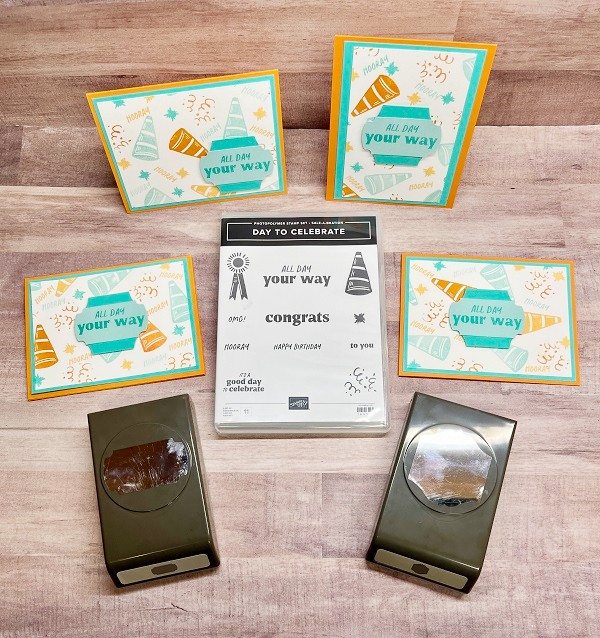
Isn’t it fun to get free products during Stampin’ Up!’s Sale-a-Bration promotion? Today, I’d like to share an exciting way to create your very own DSP (Designer Series Paper). This technique is easy to do with the new 2025 Sale-a-Bration stamp set, Day to Celebrate.
Pick Your Colors
I was inspired to try this technique by the Color Buddies shown on page 32 of the 2025 Spring Mini Catalog. Don’t you love all the hints and suggestions given in the catalogs? I find a new idea and get inspired almost every time I look through them! To begin stamping, get out these Color Buddies ink pads: Summer Splash, Pool Party, Pumpkin Pie, and Peach Pie.
Prepare Your Card Bases
Cut 4 Pumpkin Pie card bases 8 ½ x 5 ½”, scored at 4 ¼”. Also cut 4 layers from Summer Splash cardstock 5 ¼ x 4”. Before attaching this layer to the front of each card base, punch a label from the center of each with the new To the Point Punch and set them aside to use later.

Stampin – Step One
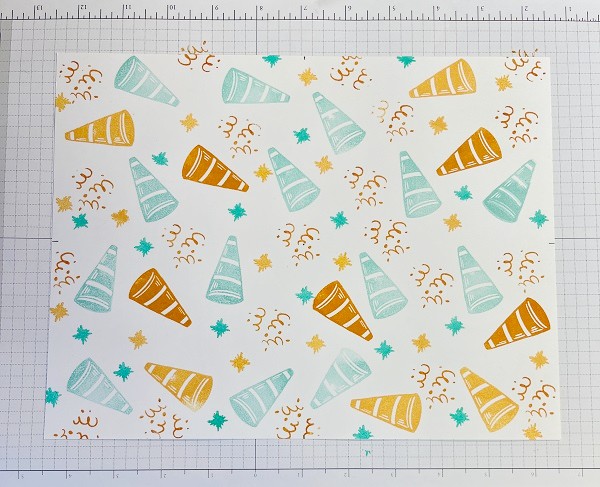
Next, get a full sheet of Basic White 8 ½ x 11” cardstock. It’s always best to begin stamping your own designs by using the largest stamp first, which in this case is the bullhorn/hat image. Begin stamping it randomly in different directions using Pool Party ink. Then stamp a few more using Pumpkin Pie and Peach Pie inks. Don’t be afraid to stamp some of the images off the page.

Stamping – Step Two
Now, randomly stamp the middle-sized image-confetti-using Pumpkin Pie ink.
Finish this step by randomly stamping the small star in Summer Splash and Peach Pie inks.
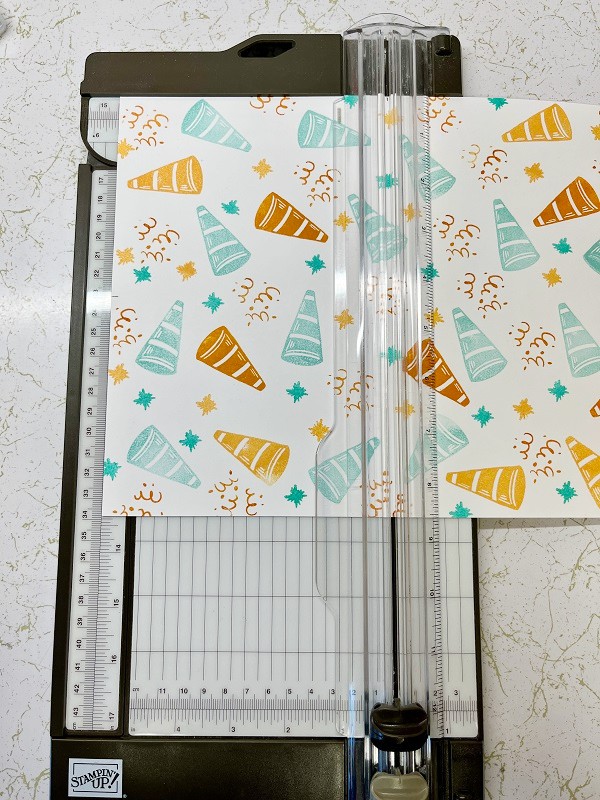
Cut Your New DSP
Now you’re ready to cut your designer series paper into four parts, which will be used to create 4 cards. Place the longest side at the top of the paper trimmer. Cut at 5”, slide the remaining paper over and cut it again at 5”. Stack and turn these pieces, again placing the longest side at the top of the trimmer, cut at 3 ¾”, slide the remaining paper over and cut again at 3 ¾”. Now each piece should measure 5 x 3 ¾”.
Design Your Cards
Look at the designs you’ve created and decide the best orientation for each piece: landscape or portrait? Turn the paper that way and finish filling in small spaces on the 4 Basic White pieces by stamping the word Hooray using Pool Party and Peach Pie ink.

Attach each piece to a card base on top of the Summer Splash layer (Summer Splash layer not shown in this picture.)
Finish Your Cards
Lastly, you’re ready to create the sentiment labels. Stamp All Day Your Way four times using Summer Splash ink on Pool Party cardstock. Punch these out with the Labeled With Love Punch.
Attach these to the To the Point pieces punched out earlier. Using Dimensionals, attach the sentiments to the card in a pleasing spot.
Stamp 5 ¼ x 4” pieces of Basic White, attach to the inside of the cards, and decorate your envelopes if desired.
Isn’t it nice to have a stash of birthday cards on hand, ready to go?
So Many Choices!
What other stamp sets would you like to try this technique with? Florals sets are fun, too—start with the largest images, fill in with medium sized images, and finish with some small images.
The Fixin’s
Product List")


Get Supplies
Thanks for supporting my small business. I appreciate every single order!!


")

 Specialty Designer Series Paper")


